
1. Hyrje
Faleminderit për blerjenasing the Karcher KA 350 Compact Stereo System. This versatile audio system combines modern design with a wide range of playback options, including a 3-disc CD changer, dual cassette deck, turntable, USB port, SD card reader, and an integrated radio. This manual provides essential information for safe operation, setup, and maintenance of your device. Please read it thoroughly before use and retain it for future reference.
2. Udhëzime të rëndësishme sigurie
- Burimi i energjisë: Sigurohuni që furnizimi me energji voltage përputhet me etiketën e vlerësimit në njësi.
- Ventilimi: Mos bllokoni asnjë hapje ventilimi. Lini hapësirë të mjaftueshme rreth njësisë për qarkullimin e duhur të ajrit.
- Uji dhe lagështia: Mos e ekspozoni pajisjen ndaj shiut, lagështirës, pikave ose spërkatjeve. Mos vendosni objekte të mbushura me lëngje, siç janë vazot, mbi pajisje.
- Nxehtësia: Mbajeni pajisjen larg burimeve të nxehtësisë, siç janë radiatorët, regjistrat e nxehtësisë, sobat ose aparate të tjera (përfshirë amplifiers) që prodhojnë nxehtësi.
- Pastrimi: Unplug the unit from the wall outlet before cleaning. Use a soft, dry cloth only.
- Servisimi: Mos u përpiqni ta shërbeni vetë këtë produkt. Drejtojini të gjithë shërbimet personelit të kualifikuar të shërbimit.
- Fëmijët: Mbajeni pajisjen dhe aksesorët e saj larg fëmijëve.
- Siguria me lazer: This product uses a laser. Use of controls or adjustments or performance of procedures other than those specified herein may result in hazardous radiation exposure.
3. Përmbajtja e paketës
Ju lutemi kontrolloni që të gjitha artikujt janë të pranishëm dhe në gjendje të mirë:
- Karcher KA 350 Compact Stereo System (Main Unit)
- Telekomandë
- Manuali i Udhëzimeve
- Stereo Speakers (2 units)
- Kabllo energjie
- Antenë FM (lloji i telit)
4. Produkti i Mbaruarview
4.1 Kontrollet e panelit të përparmë
The front panel provides access to all primary functions and controls for the KA 350 system.

Figura 4.1: Kontrollet e Panelit të Përparmë
- Butoni NDEZUR/NË PRITJE: Aktivizon ose fiket njësinë.
- Butoni i FUNKSIONIT: Selects between CD, Tuner (Radio), Phono (Turntable), Tape (Cassette), and USB/SD modes.
- Doreza e VËLIMIT: Rregullon nivelin kryesor të volumit.
- CD Controls: Play/Pause, Stop, Skip/Search (Forward/Backward), Open/Close CD tray.
- Kontrollet e kasetave: Play, Record, Fast Forward, Rewind, Stop/Eject for Deck 1 and Deck 2.
- USB/SD Controls: Play/Pause, Stop, Skip/Search (Forward/Backward).
- Kontrollet e sintonizuesit: Band selection (AM/FM), Tuning Up/Down, Memory presets.
- Shfaq: Tregon modalitetin aktual, informacionin e këngës, frekuencën e radios dhe kohën.
4.2 Lidhjet e panelit të pasmë
The rear panel houses all necessary input and output connections for the system.
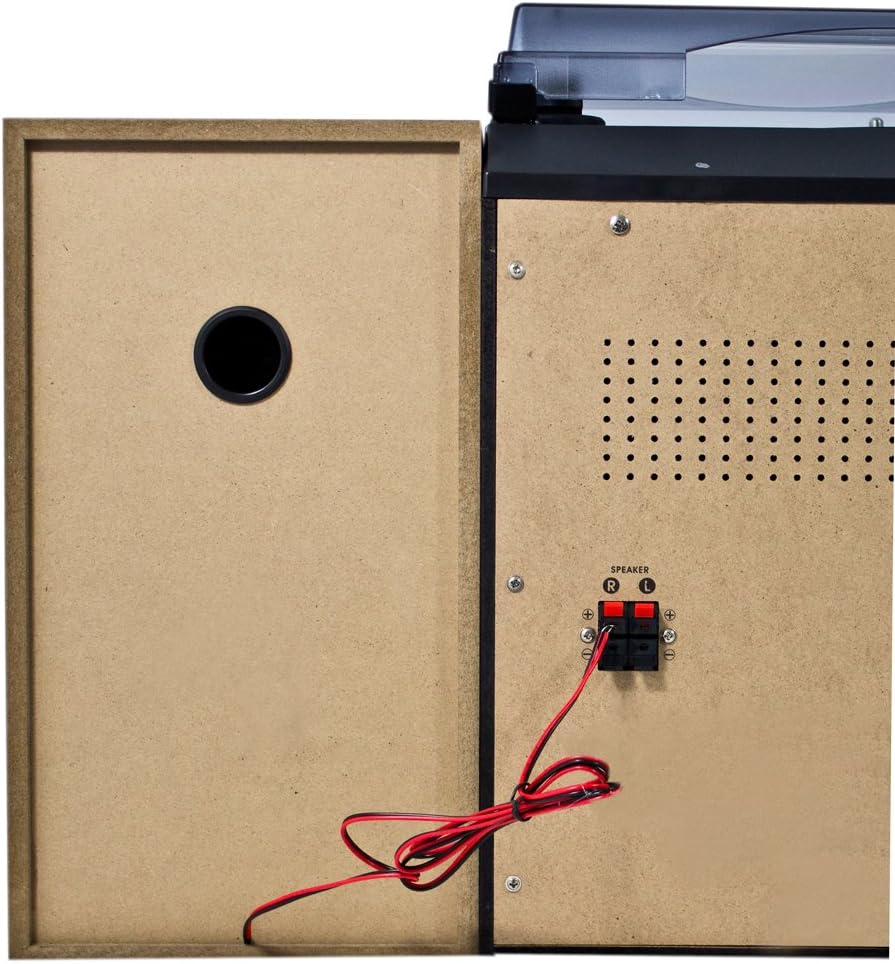
Figura 4.2: Lidhjet e Panelit të Pasmë
- Speaker Terminals (R/L): Connect the included stereo speakers. Ensure correct polarity (+ to + and - to -).
- Hyrja e energjisë AC: Lidhni kabllon e energjisë këtu.
- Terminali i antenës FM: Connect the supplied FM wire antenna for radio reception.
4.3 Përbërësit kryesorë

Figure 4.3: Karcher KA 350 Main Components
- Pllaka rrotulluese: Located on top, for playing vinyl records.
- 3-Disc CD Changer: Front-loading tray for multiple CDs.
- Dual Cassette Deck: Two cassette compartments for playback and recording.
- Porta USB: Për lidhjen e disqeve USB.
- Vendi i kartës SD: Për futjen e kartave të memories SD.
- Altoparlantët stereo: Two external speakers for audio output.
5. Konfigurimi
5.1 Shpaketimi dhe vendosja
- Hiqni me kujdes të gjithë përbërësit nga paketimi.
- Place the main unit on a stable, flat surface.
- Position the speakers on either side of the main unit, ensuring they are at an equal distance for optimal stereo sound.
- Sigurohuni që të ketë ventilim të mjaftueshëm rreth njësisë.
5.2 Lidhja e altoparlantëve
Connect the supplied speakers to the speaker terminals on the rear of the main unit.

Figure 5.1: Speaker Unit
- Identify the speaker wires. Each wire typically has two strands, one marked for positive (+) and one for negative (-).
- Connect the positive (+) terminal of the left speaker to the 'L+' terminal on the main unit's rear panel.
- Connect the negative (-) terminal of the left speaker to the 'L-' terminal on the main unit's rear panel.
- Repeat the process for the right speaker, connecting it to the 'R+' and 'R-' terminals.
- Ensure all connections are secure to prevent sound distortion or damage.
5.3 Lidhja e antenës FM
For optimal radio reception, connect the supplied FM wire antenna.
- Insert the FM antenna plug into the FM antenna jack on the rear panel.
- Extend the wire antenna fully and position it for the best possible reception. You may need to experiment with its placement.
5.4 Lidhja e energjisë
- Plug the AC power cable into the AC power input on the rear of the main unit.
- Lidhni anën tjetër të kabllit të energjisë në një prizë standarde muri.
6. Udhëzimet e funksionimit
6.1 Ndez/Fik
Shtypni ON / STANDBY butonin në panelin e përparmë ose në telekomandë për të ndezur ose fikur njësinë.
6.2 Zgjedhja e modalitetit
Shtypni FUNKSIONI button repeatedly to cycle through the available modes: CD, Tuner (Radio), Phono (Turntable), Tape (Cassette), and USB/SD.
6.3 Funksionimi i CD Player-it

Figure 6.1: CD Changer Tray
- Shtypni FUNKSIONI butoni për të zgjedhur modalitetin CD.
- Shtypni HAP/MBYLL butonin për të hapur sirtarin e CD-së.
- Place up to three CDs onto the disc trays, label side up.
- Shtypni HAP/MBYLL butonin përsëri për të mbyllur sirtarin.
- Shtypni LUAJ/PAUZI butoni për të filluar riprodhimin.
- Përdorni SHKIP / KARRKO buttons to navigate between tracks or fast forward/rewind.
6.4 Funksionimi i Kasetofonit/Regjistruesit
- Shtypni FUNKSIONI butonin për të zgjedhur modalitetin TAPE.
- Shtypni NDALO/HEQ button on either Deck 1 or Deck 2 to open the cassette compartment.
- Fusni një kasetë dhe mbyllni ndarjen.
- Shtypni LUAJ butoni për të filluar riprodhimin.
- To record, insert a blank tape into Deck 2 (for recording from Deck 1 or other sources) or Deck 1 (for recording from external sources if applicable). Press the REKORD butonin.
6.5 Funksionimi i gramafonit
- Shtypni FUNKSIONI button to select PHONO mode.
- Hapni kapakun e pluhurit.
- Vendosni një disk vinili në pjatë.
- Zgjidhni shpejtësinë e duhur (33, 45 ose 78 RPM) duke përdorur çelësin e përzgjedhjes së shpejtësisë.
- Carefully lift the tone arm and place the stylus onto the desired groove of the record.
- At the end of the record, manually return the tone arm to its rest.
6.6 Luajtje me USB/SD
- Shtypni FUNKSIONI button to select USB/SD mode.
- Futni një pajisje USB flash në portën USB ose një kartë SD në vendin e kartës SD.
- Njësia do të zbulojë automatikisht dhe do të fillojë të luajë audio të pajtueshme files (MP3, WMA, AAC).
- Përdorni LUAJ/PAUZI dhe SHKIP / KARRKO butonat për të kontrolluar riprodhimin.
6.7 Operacioni i radios
- Shtypni FUNKSIONI button to select TUNER mode.
- Shtypni BAND button to select between FM and AM bands.
- Përdorni TUNING buttons to manually tune to a station or press and hold for automatic scanning.
- Për të ruajtur një stacion, shtypni butonin KUJTESA butonin, pastaj përdorni SHKIP / KARRKO butonat për të zgjedhur një numër të paracaktuar dhe shtypni KUJTESA përsëri për të konfirmuar.
6.8 Telekomanda
Telekomanda e përfshirë lejon përdorimin e lehtë të të gjitha funksioneve nga distanca. Sigurohuni që bateritë të jenë vendosur saktë.
7. Mirëmbajtja
7.1 Pastrimi i njësisë
- Hiqeni gjithmonë njësinë nga priza përpara se ta pastroni.
- Përdorni një leckë të butë dhe të thatë për të fshirë sipërfaqet e jashtme.
- Mos përdorni pastrues gërryes, dyllë ose tretës pasi ato mund të dëmtojnë sipërfaqen.
7.2 Kujdesi për stilolapsin e gramafonit
- Handle the stylus with extreme care. Only touch the tone arm, not the stylus itself.
- Pastroni stilolapsin periodikisht me një furçë të butë, duke e fërkuar nga mbrapa përpara.
- Replace the stylus when it shows signs of wear (e.g., distorted sound, skipping).
7.3 Cassette Deck Care
- Pastroni rregullisht kokat e shiritit, kapstanin dhe rulin e pinçit me një shtupë pambuku, duke i fërkuar lehtë.ampe shoqëruar me alkool izopropil.
- Demagnetize the tape heads periodically to maintain sound quality.
8. Troubleshooting
| Problem | Shkaku i mundshëm | Zgjidhje |
|---|---|---|
| Asnjë fuqi | Kablloja e energjisë nuk është e lidhur; Priza e energjisë nuk është aktive | Kontrolloni lidhjen e kabllit të energjisë; provoni një prizë tjetër |
| Asnjë zë | Volume too low; Speakers not connected correctly; Incorrect function mode selected | Increase volume; Check speaker connections and polarity; Select correct function mode |
| CD-ja po kalon ose nuk po luhet | CD is dirty or scratched; CD inserted incorrectly | Clean or replace CD; Insert CD label side up |
| Marrja e dobët e radios | Antenna not connected or poorly positioned; Weak signal | Connect and adjust FM antenna; Try repositioning the unit |
| Shpejtësia e gramafonit është e pasaktë | Është zgjedhur shpejtësia e gabuar | Adjust the speed selector switch (33/45/78 RPM) |
| Probleme me riprodhimin e USB/SD | E papajtueshme file format; Karta USB/SD nuk është futur saktë; E dëmtuar files | Sigurohu files are MP3, WMA, or AAC; Reinsert USB/SD card; Try a different USB/SD card |
9. Specifikimet
| Veçori | Specifikimi |
|---|---|
| Markë | Karcher |
| Numri i modelit | KA 350 |
| Teknologjia e lidhjes | FM/MW Tuner, USB, SD |
| Ngjyra | E zezë |
| Lloji i altoparlantit | Stereo (2 speakers included) |
| Dimensionet e artikullit (L x P x H) | 70.5 x 41 x 37.3 cm |
| Burimi i energjisë | Elektrike me kabllo |
| Pajisjet e përputhshme | Smartphone, Tablet, MP3 Player, Personal Computer |
| Pesha e artikullit | 10.8 kilogramë |
| Prodhimi i energjisë (RMS) | 2 x 5 W (Total 50 W) |
| Supported Media Standards | MP3, CD, Cassette, USB, SD |
| Formatet e mbështetura audio | CD-DA, MP3, WMA, AAC |
| Mbështetje Bluetooth | Nr |
| Numri i folësve | 2 |
| Modaliteti i daljes audio | Stereo |
| Konfigurimi i tingullit rrethues | 2.0 |
| Komponentët e përfshirë | Compact system, Remote control, Instruction manual |
10. Garancia dhe Mbështetja
For warranty information and technical support, please refer to the warranty card included with your product or visit the official Karcher webfaqe interneti. Ruajeni provën e blerjes për çdo kërkesë garancie.
Prodhuesi: Karcher