1. Hyrje
This user manual provides comprehensive instructions for the ASRock B860M-X Micro ATX motherboard. It covers installation, configuration, operation, and troubleshooting to ensure optimal performance and longevity of your system. The ASRock B860M-X is designed to support Intel Core Ultra processors with an LGA1851 socket, offering advanced features for a powerful computing experience.
2. Informacion mbi sigurinë
Gjithmonë zbatoni masat paraprake të sigurisë gjatë instalimit dhe funksionimit:
- Shkëputeni kabllon e energjisë nga priza e murit përpara se të prekni ndonjë komponent.
- Vishni një rrip dore antistatik për të parandaluar dëmtimin e komponentëve nga shkarkimi elektrostatik (ESD).
- Kapni pjesët nga skajet e tyre për të shmangur prekjen e pjesëve të ndjeshme.
- Sigurohuni që të ventiloni siç duhet brenda kutisë së kompjuterit tuaj për të parandaluar mbinxehjen.
- Mos e ekspozoni pllakën amë ndaj lagështirës ose temperaturave ekstreme.
3. Përmbajtja e paketës
Verifikoni që të gjitha artikujt janë të pranishëm në paketën e motherboard-it tuaj:
- ASRock B860M-X Micro ATX Motherboard
- Udhëzues i instalimit të shpejtë
- Njoftimi Rregullues
- Kabllo të dhënash SATA
- Unë / O Mburoja
- Vida/Mbështetëse M.2

Image: ASRock B860M-X Motherboard and included accessories.
4. Paraqitja e motherboard
Familiarize yourself with the key components and connectors on your ASRock B860M-X motherboard.

Imazh: Nga lart poshtë view of the ASRock B860M-X Micro ATX Motherboard, highlighting the CPU socket, RAM slots, and various connectors.
Paneli i pasmë I/O
Paneli i pasmë I/O ofron porta të ndryshme për lidhjen e pajisjeve periferike.
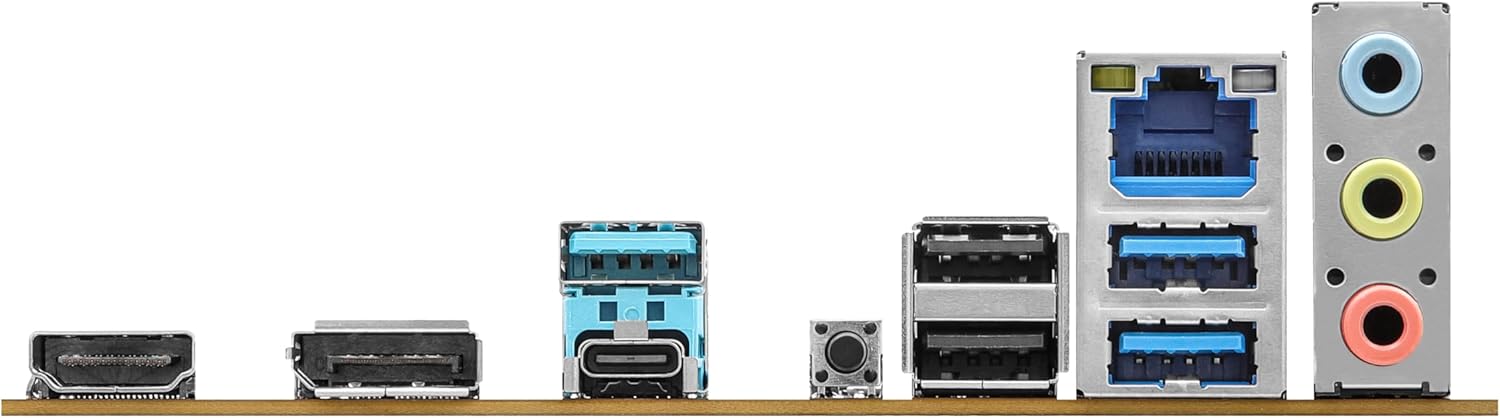
Image: Close-up of the rear I/O panel, showing USB ports, HDMI, DisplayPort, Ethernet, and audio jacks.
5. Konfigurimi dhe instalimi
Ndiqni këto hapa për instalimin e duhur të motherboard-it dhe komponentëve tuaj.
5.1 Instalimi i CPU-së (LGA1851)
- Hapni levën e prizës së CPU-së.
- Carefully align the CPU with the socket, ensuring the notches match.
- Vendoseni butësisht CPU-në në prizë pa e detyruar.
- Mbylleni levën e prizës për të siguruar CPU-në.
5.2 Instalimi i Memories (RAM)
The ASRock B860M-X supports 2 x DDR5 DIMMs for dual-channel memory up to 9066+ MHz (OC).
- Hapni kapëset në të dy skajet e vendit DIMM.
- Align the memory module with the slot, ensuring the notch on the module matches the slot key.
- Shtypni fort në të dy skajet e modulit të memories derisa kapëset të fiksohen në vendin e tyre.
5.3 Instalimi i memories (M.2 dhe SATA)
The motherboard supports M.2 drives and up to 4 SATA3 6.0 Gb/s devices.
- M.2 SSD: Locate the M.2 slot(s). Insert the M.2 SSD into the slot at an angle and secure it with the provided screw/standoff.
- Disqet SATA: Connect SATA data cables from your storage devices (HDDs/SSDs) to the SATA3 ports on the motherboard. Connect power cables from your power supply to the SATA devices.
5.4 Instalimi i Kartës së Zgjerimit (PCIe)
The motherboard features PCIe slots for graphics cards and other expansion cards.
- Align your graphics card or other PCIe card with the appropriate slot.
- Press down firmly until the card is seated correctly and the retention clip locks.
- Secure the card to the PC case with a screw.
5.5 Lidhjet e Furnizimit me Energji
Lidhni lidhësin e energjisë ATX me 24 kunja dhe lidhësin e energjisë së CPU-së me 8 kunja nga furnizimi me energji në portat përkatëse në pllakën amë.
5.6 Lidhjet e panelit të përparmë
Connect the front panel cables (power button, reset button, USB ports, audio jacks, etc.) to their respective headers on the motherboard. Refer to the motherboard diagram for exact locations.
6. Udhëzimet e funksionimit
6.1 Nisja e Parë
After assembling your system, connect your monitor, keyboard, and mouse. Power on your system. The system should display the ASRock logo and enter the BIOS setup or begin the operating system installation process.
6.2 Konfigurimi i BIOS/UEFI
Për të hyrë në programin e konfigurimit të BIOS-it, shtypni butonin Fshije or F2 key during the Power-On Self-Test (POST) screen. Here you can configure various system settings, including boot order, CPU settings, memory timings, and fan speeds.
6.3 Instalimi i shoferit
After installing your operating system, install the necessary drivers for your motherboard components (chipset, audio, LAN, graphics, etc.) from the ASRock website or the included driver CD/USB drive.
7. Mirëmbajtja
7.1 Përditësimi i BIOS-it
Keeping your BIOS updated ensures compatibility with new hardware and improves system stability. ASRock provides two methods for BIOS updates: USB BIOS Flashback and Instant Flash.
Video: ASRock Motherboard BIOS Update Tutorial. This video demonstrates two methods for updating your ASRock motherboard's BIOS: USB BIOS Flashback and Instant Flash.
7.2 Pastrimi
Regularly clean your PC case and motherboard to prevent dust buildup, which can lead to overheating and component failure. Use compressed air to remove dust from fans, heatsinks, and other components. Ensure the system is powered off and unplugged before cleaning.
8. Troubleshooting
If you encounter issues, refer to these common troubleshooting tips:
- Pa fuqi: Check all power connections (24-pin ATX, 8-pin CPU, GPU, SATA). Ensure the power supply switch is on.
- Pa shfaqje: Verify monitor connection and input source. Reseat the graphics card and memory modules.
- Paqëndrueshmëria e sistemit: Check memory compatibility and seating. Ensure CPU cooler is properly installed. Update BIOS and drivers.
- Probleme me nisjen: Check boot order in BIOS. Verify storage device connections.
9. Specifikimet
Key technical specifications for the ASRock B860M-X Micro ATX Motherboard:
| Veçori | Specifikimi |
|---|---|
| Markë | ASRock |
| Emri i modelit | B860M-X |
| Socket CPU | LGA 1851 |
| Procesorë të pajtueshëm | Intel Core Ultra |
| Lloji i çipsetit | Intel B860 |
| Teknologjia e memories RAM | DDR5 |
| Shpejtësia e orës së kujtesës | 9066 MHz (OC) |
| Kapaciteti maksimal i ruajtjes së kujtesës | 128 GB |
| Vendet e memories të disponueshme | 2 |
| Portat SATA gjithsej | 4 |
| Total PCIe Ports | 3 |
| Opsionet e Daljes së Grafikëve | 1 HDMI, 1 DisplayPort |
| Numri i Portave Ethernet | 1 |
| Kodiku i audios | Realtek ALC1220 7.1 CH HD Audio Codec |
| Power Phase Design | 7+1+1+1+1 |
| Ndriçimi RGB | Polychrome RGB |
Video: Mbiview of Intel B860 Series Motherboards. This video highlights key features and design aspects of the ASRock B860 motherboard series.
10. Garancia dhe Mbështetja
ASRock provides a 3-year warranty for this product. For technical support, driver downloads, and further information, please visit the official ASRock webfaqja. Gjithashtu mund të gjeni burime shtesë mbështetjeje dhe pyetje të shpeshta atje.
For warranty claims or service, please contact your retailer or authorized ASRock service center with your proof of purchase.


