1. Udhëzime të rëndësishme sigurie
Please read all instructions before using this sewing machine. This machine is intended for household use only.
RREZIK - Për të zvogëluar rrezikun e goditjes elektrike:
- Një pajisje nuk duhet të lihet kurrë pa mbikëqyrje kur futet në prizë.
- Gjithmonë shkëputeni këtë pajisje nga priza elektrike menjëherë pas përdorimit dhe para pastrimit.
- Gjithmonë hiqeni prizën përpara se të ri-lamping. Zëvendësoni llambën me të njëjtin lloj të vlerësuar me 15 vat (zona 110-120 V) ose 15 vat (zona 220-240 V).
KUJDES - Për të zvogëluar rrezikun e djegieve, zjarrit, goditjes elektrike ose lëndimit të personave:
- Mos lejoni të përdoret si lodër. Vëmendje e madhe është e nevojshme kur kjo pajisje përdoret nga ose pranë fëmijëve.
- Përdoreni këtë pajisje vetëm për përdorimin e synuar siç përshkruhet në këtë manual. Përdorni vetëm bashkëngjitjet e rekomanduara nga prodhuesi siç përmbahet në këtë manual.
- Mos e përdorni kurrë këtë pajisje nëse ka një kordon ose prizë të dëmtuar, nëse nuk funksionon siç duhet, nëse ka rënë ose dëmtuar ose ka rënë në ujë. Kthejeni pajisjen te tregtari më i afërt i autorizuar ose qendra e shërbimit për ekzaminim, riparim, rregullim elektrik ose mekanik.
- Asnjëherë mos e përdorni pajisjen me asnjë hapje ajri të bllokuar. Mbani hapjet e ajrosjes së makinës së qepjes dhe kontrolluesit të këmbës nga grumbullimi i garzave, pluhurit dhe leckës së lirshme.
- Mbani gishtat larg nga të gjitha pjesët në lëvizje. Kërkohet kujdes i veçantë rreth gjilpërës së makinës qepëse.
- Përdorni gjithmonë pllakën e duhur të gjilpërës. Pllaka e gabuar mund të shkaktojë thyerjen e gjilpërës.
- Mos përdorni gjilpëra të përkulura.
- Mos e tërhiqni ose shtyni pëlhurën gjatë qepjes. Mund të devijojë gjilpërën duke shkaktuar thyerjen e saj.
- Always unplug sewing machine off ("O") when making any adjustments in the needle area, such as threading needle, changing needle, threading bobbin, or changing presser foot, and the like.
- Gjithmonë hiqni makinën qepëse nga priza elektrike kur hiqni mbulesat, lubrifikoni ose kur bëni ndonjë rregullim tjetër të servisimit të përdoruesit të përmendur në manualin e udhëzimeve.
- Asnjëherë mos hidhni ose futni ndonjë objekt në asnjë hapje.
- Mos e përdorni jashtë.
- Mos veproni aty ku përdoren produkte spërkatës aerosoli ose ku administrohet oksigjeni.
- Për ta shkëputur, kthejini të gjitha kontrollet në pozicionin e fikur ("O"), pastaj hiqeni spinën nga priza.
- Mos e shkëputni nga priza duke e tërhequr kordonin. Për ta shkëputur, kapni spinën, jo kordonin.
- Niveli i presionit të zërit në kushte normale funksionimi është 75dB(A).
- Always turn off the machine or unplug when the machine is not operating properly.
- Asnjëherë mos vendosni asgjë në kontrolluesin e këmbës.
- If the supply cord to the foot controller is damaged, it must be replaced by the manufacturer or its service agent or a similar qualified person in order to avoid a hazard.
- Kjo pajisje nuk është e destinuar për t'u përdorur nga persona (përfshirë fëmijët) me aftësi të kufizuara fizike, shqisore ose mendore, ose me mungesë përvoje dhe njohurie, përveç rastit kur atyre u është dhënë mbikëqyrje ose udhëzim në lidhje me përdorimin e pajisjes nga një person përgjegjës për sigurinë e tyre.
- Fëmijët duhet të mbikëqyren për t'u siguruar që ata të mos luajnë me pajisjen.
RUAJNI KËTO UDHËZIME
Image: Important Safety Instructions page from the Singer 2250 manual, detailing electrical and general safety warnings.
2. Konfigurimi
2.1 Aksesorë
The Singer 2250 sewing machine comes with a set of standard accessories and supports various optional accessories for different sewing tasks.
- Aksesorë standardë: All purpose foot, Button sewing foot, Zipper foot, Screwdriver, Seam ripper/brush, Pack of needles, Bobbin (3), Darning plate, Spool holder.
- Optional Accessories (not supplied with machine, available from SINGER® retailers): Edge/quilting guide, Zipper foot, Straight stitch foot, Overcasting foot, Hemmer foot, Blind hem foot, Satin stitch foot, Cording/embroidery foot, Second spool pin, Spool pin felt.
2.2 Mbështjellja e bobinës
- Place thread and corresponding spool holder onto the spool pin.
- Snap the thread into the thread guide.
- Wind the thread counterclockwise around the bobbin winder tension disc.
- Thread the bobbin as illustrated and place it on the spindle.
- Push the bobbin spindle to the right.
- Hold the thread end.
- Step on the foot control pedal to begin winding.
- Cut the thread once the bobbin is full.
- Push the bobbin spindle to the left and remove the wound bobbin.
Ju lutemi vini re: When the bobbin winder spindle is in the "bobbin winding" position, the machine will not sew and the hand wheel will not turn. To start sewing, push the bobbin winder spindle to the left (sewing position).

Image: Manual page illustrating standard and optional accessories, and a step-by-step guide for winding the bobbin.
2.3 Connecting to Power Source
Ensure the machine's power switch is in the "O" (off) position. Insert the machine plug into the electrical outlet. Always use a grounded outlet.
2.4 Raising the Presser Foot Lifter
The presser foot lifter is located at the back of the needle bar area. Lift it to raise the presser foot for placing fabric, and lower it to hold the fabric in place for sewing.
3. Operacioni
3.1 Choosing Your Pattern
The Singer 2250 features a Pattern Selector Dial to choose various stitch patterns.
- Stitches indicated in black on the diagram correspond to the Pattern Selector Dial.
- For patterns indicated with the "S" color, turn the Pattern Selector Dial to "S", then use the Stitch Length Dial to adjust the desired stitch length.
- The Pattern Selector Dial can be turned in either direction.
3.2 Stitch Length Dial
The Stitch Length Dial controls the length of straight stitches and the density of zig-zag stitches.
- For Straight Stitching: Turn the Pattern Selector Dial to the straight stitch symbol. The stitch length increases as the dial approaches "4". Use longer stitches for heavier fabrics and thicker needles, shorter stitches for lighter fabrics and finer needles.
- For Zig-Zag Stitching: Turn the Pattern Selector Dial to "~~~ ". The density of zig-zag stitches increases as the setting of the stitch length dial approaches "0". Dense zig-zag stitches are known as satin stitches.

Image: Manual page detailing how to choose stitch patterns and adjust stitch length for various sewing applications.
3.3 Vendosja e filetos në makinë
Proper threading is crucial for smooth sewing. Follow these general steps:
- Vendosni bobinën e fillit në kunjin e bobinës.
- Kaloni fijen nëpër udhëzuesit e sipërm të fijes.
- Kaloni fijen përmes disqeve të tensionit.
- Sillni fijen lart përmes levës së marrjes.
- Guide the thread down through the needle bar thread guide.
- Fije gjilpërën nga përpara në mbrapa.
- Raise the bobbin thread by turning the handwheel towards you, catching the bobbin thread with the needle thread.
- Pull both threads under the presser foot and towards the back.
3.4 Sewing on Buttons
To sew buttons using your Singer 2250:
- Instaloni pllakën paralajmëruese.
- Change the all-purpose foot to the button sewing tool.
- Position the fabric and button under the foot.
- Lower the button to the desired position and lower the foot.
- Set the Pattern Selector Dial on "---" and sew a few securing stitches.
- Select one of the two narrow zig-zag patterns (between 0.5 and 1.5) and sew through both holes of the button. Turn the handwheel to check needle clearance.
- Slowly sew the button with about 10 stitches.
- Select pattern "---" again and sew a few securing stitches.
- If a shank is required, place a darning needle on top of the button and sew.
- For buttons with 4 holes, sew through the front two holes first, then sew backwards and then sew through the back two holes.
3.5 Installing the Removable Extension Table
The removable extension table provides a larger work surface and also serves as an accessory box.
- Për të instaluar: Hold the removable extension table horizontally and push it in the direction of the arrow until it clicks into place.
- Për të hequr: Pull the extension table towards the left.
- The inside of the removable extension table can be used as an accessory box. To open, flip the cover down.
4. Mirëmbajtja
4.1 Darning Plate
The darning plate is used for specific tasks like darning or free-hand embroidery.
- Instalimi: Install the darning plate as illustrated in the manual.
- Heqja: Për qepje normale, hiqni pllakën paralajmëruese.
- For free-motion sewing, a darning/embroidery foot (optional accessory) is recommended.
4.2 Inserting & Changing Needles
Regularly change your needle, especially if sewing problems occur. Use SINGER® Brand Needles for best results.
- Turn the power switch to off ("O").
- Lironi gjilpërën clamp vidhos.
- Insert the new needle with the flat side of the shaft facing the back, pushing it up as far as it will go.
- Shtrëngoni gjilpërën clamp vidhos.
Kujdes: Needles must be in perfect condition. Problems can occur with bent needles, damaged points, or blunt needles.
4.3 Changing the Bulb
To change the light bulb, ensure the machine is unplugged. Replace the bulb with the same type rated 15 watts (110-120V area) or 15 watts (220-240V area).
4.4 Pastrimi
Regularly clean the lint and dust from the bobbin case area and feed dogs using the provided brush. Ensure the machine is unplugged before cleaning.
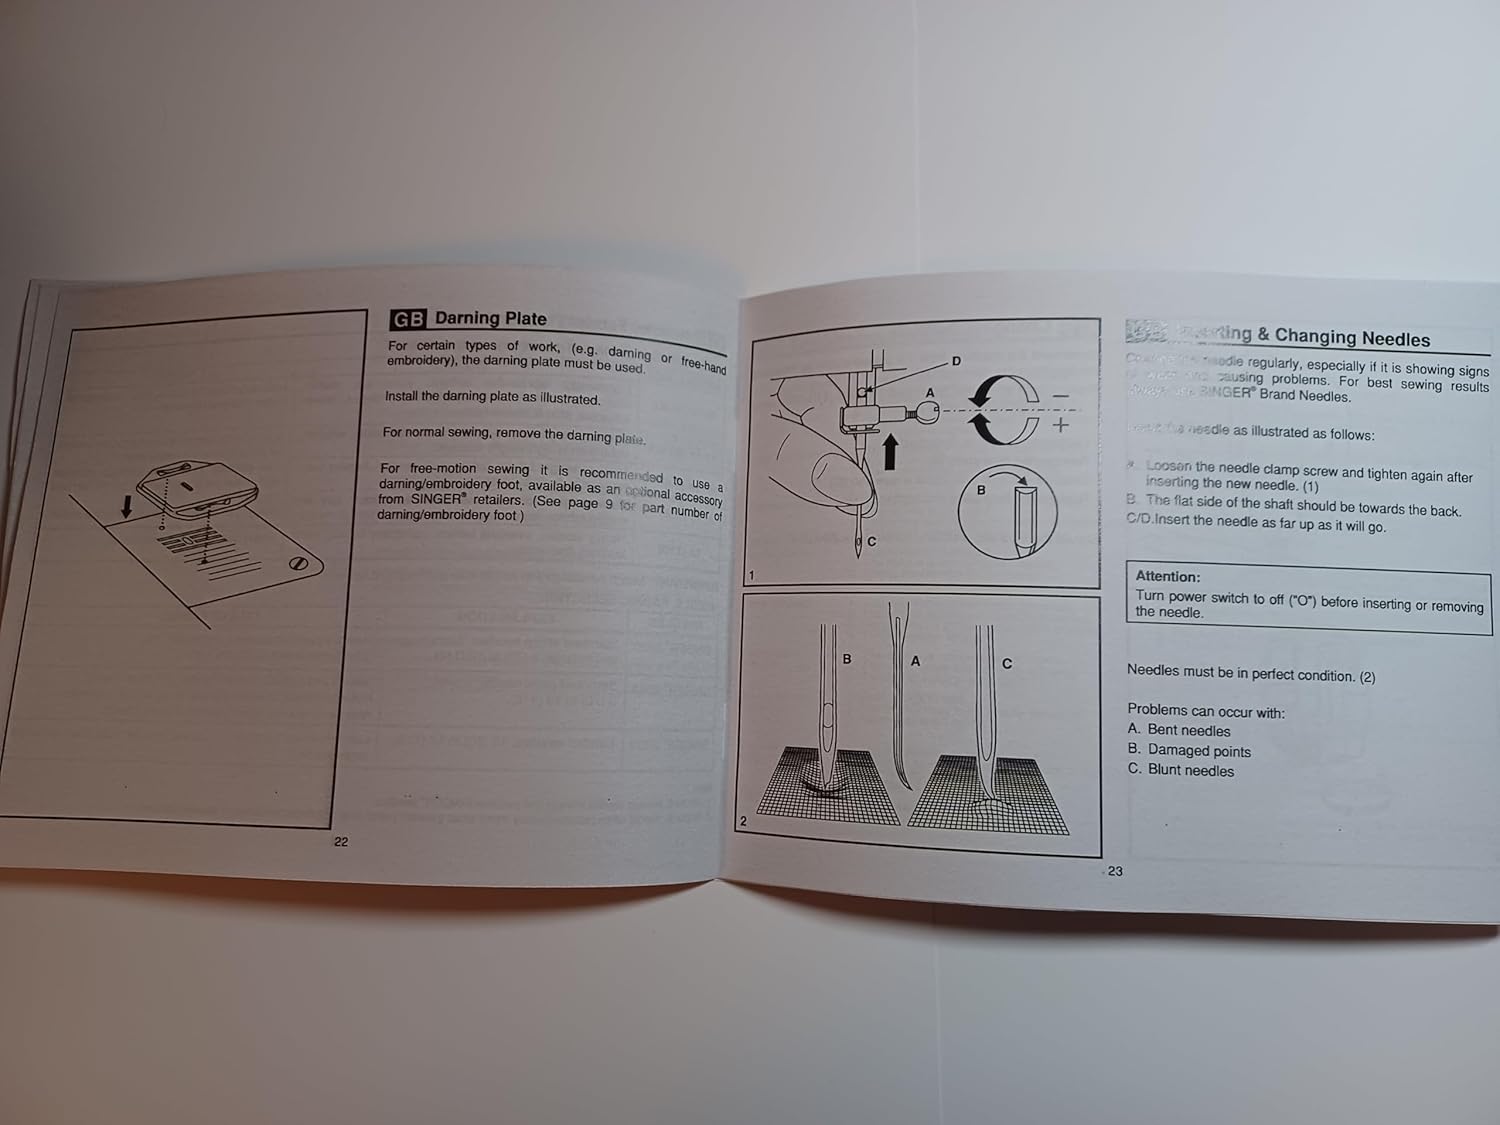
Image: Manual page illustrating procedures for sewing on buttons, installing the extension table, using the darning plate, and changing needles.
5. Troubleshooting
If you encounter issues with your Singer 2250, refer to the following common problems and solutions:
- Qepjet e anashkaluara: Ensure the needle is inserted correctly, not bent, and is the appropriate size for the fabric and thread. Re-thread the machine.
- Thyerja e fillit: Check for correct threading, proper tension, a bent or blunt needle, or burrs on the needle plate or bobbin case.
- Rrudhosja e pëlhurës: Adjust tension settings, use the correct needle size, or ensure the presser foot pressure is appropriate for the fabric.
- Makina nuk e ushqen pëlhurën: Check if the feed dogs are raised. Ensure the presser foot is lowered.
- Operacioni i zhurmshëm: Clean and lubricate the machine as per maintenance instructions. Check for loose parts or a bent needle.
For persistent problems, contact an authorized Singer service center.
6. Specifikimet
| Dimensionet e produktit | 8.5 x 5.5 x 0.1 inç |
| Pesha e artikullit | 3 ons |
| Numri i modelit | SINGER 2250 Manual |
| Prodhuesi | TabSynth Design (for reproduction manual) |
| ASIN | B0G19M5M63 |
7. Garancia dhe Mbështetja
This instruction manual is a reproduction for the Singer 2250 Sewing Machine. For warranty information regarding your Singer 2250 sewing machine, please refer to the original documentation provided with your machine or contact Singer customer support directly.
For support related to the operation or maintenance of your Singer 2250, please consult this manual. If further assistance is needed, contact an authorized Singer service center or your local Singer dealer.


