1. Hyrje
This manual provides detailed instructions for the assembly, safe operation, and proper maintenance of your Polibi Wood Full Over Full Bunk Bed with Trundle, Storage Shelves & Hooks. Please read all instructions carefully before beginning assembly and retain this manual for future reference.
The Polibi bunk bed is designed to offer a space-saving sleeping solution with integrated storage. It features a full-size upper bunk, a full-size lower bunk, a pull-out trundle bed, and convenient storage shelves with hooks.
2. Informacion i rëndësishëm për sigurinë
Mosrespektimi i këtyre paralajmërimeve mund të rezultojë në lëndime serioze.
- LEXO TË GJITHA UDHËZIMET PARA PËRDORIMIT.
- PARALAJMËRIM: Bunk beds can present a serious risk of injury from falls. Always use the provided ladder for access to the upper bunk.
- PARALAJMËRIM: Krevati i sipërm nuk është i përshtatshëm për fëmijë nën gjashtë vjeç.
- PARALAJMËRIM: Ensure all connections are tight before use and check periodically. Do not use the bed if any structural part is broken or missing.
- PARALAJMËRIM: Mos lejoni më shumë se një person në kokat e sipërme.
- PARALAJMËRIM: Mos lidhni ose varni sende në asnjë pjesë të krevatit marinari që nuk janë projektuar për përdorim me krevatin; për shembullample, por pa u kufizuar në, grepa, rripa ose litarë kërcimi.
- PARALAJMËRIM: Always use the recommended mattress size for both upper and lower bunks, and the trundle bed. The maximum mattress thickness for the upper bunk should not exceed 6 inches to ensure proper guardrail height.
- PARALAJMËRIM: Mbajini fëmijët larg zonës së montimit gjatë ndërtimit.
- PARALAJMËRIM: Mos u hidhni mbi shtrat.
- PARALAJMËRIM: Përdorni parmakë mbrojtëse në të dy anët e krevatit të sipërm.
- PARALAJMËRIM: Periodically check and ensure that the guardrail, ladder, and other components are in their proper position and free from damage.
3. Përmbajtja e paketës
Para se të filloni montimin, sigurohuni që të gjitha pjesët janë të pranishme dhe të padëmtuara. Nëse ndonjë pjesë mungon ose është e dëmtuar, mos vazhdoni me montimin. Kontaktoni mbështetjen e klientit për ndihmë.
Komponentët tipikë përfshijnë:
- Bunk bed frame components (headboards, footboards, side rails)
- Trundle bed frame components
- Wooden slats for all bed levels
- Shkallë
- Storage shelves and hooks
- Paketë pajisjesh (vida, bulona, arra, çelës Allen)
- Manuali i udhëzimeve
4. Udhëzime për konfigurimin dhe montimin
Assembly requires at least two adults. Clear a spacious area for assembly. Do not use power tools for assembly as this may overtighten fasteners and damage the wood.
Hapi 1: Shpaketoni dhe identifikoni pjesët
Carefully unpack all components and lay them out on a soft, clean surface to prevent scratches. Refer to the parts list (usually found at the beginning of the included paper manual) to identify each piece.

Image: Overall dimensions of the bunk bed, including length, width, and height measurements for the main bed and trundle.
Step 2: Assemble the Lower Bunk Frame
Begin by connecting the side rails to the headboard and footboard of the lower bunk using the provided hardware. Ensure all bolts are finger-tight at this stage.
Step 3: Assemble the Upper Bunk Frame
Similar to the lower bunk, assemble the upper bunk frame, including the guardrails. Pay close attention to the orientation of the guardrails and the decorative house-like structure on the upper bunk.

Image: Detail of the upper bunk's design, showing the decorative roofline and window cutouts.
Step 4: Attach Storage Shelves and Hooks
Install the storage shelves and hooks onto the designated areas of the bunk bed frame, typically on the side of the lower bunk. Secure them firmly with the appropriate hardware.

Image: Integrated storage shelves, providing space for books or small items.
Step 5: Stack the Bunks and Install Ladder
Carefully lift the upper bunk frame and place it onto the lower bunk frame, aligning the connecting pins or brackets. Secure these connections. Then, attach the ladder to the designated side of the bunk bed.
Step 6: Assemble the Trundle Bed
Assemble the trundle bed frame according to the instructions, attaching its wheels or casters. The trundle is designed to slide underneath the lower bunk.

Image: Detail of the trundle bed frame, showing its slat support system.
Step 7: Install Bed Slats and Final Tightening
Place the wooden slats across the bed frames for both the upper and lower bunks, and the trundle. Secure them as instructed (usually with screws). Once all components are assembled, go back and tighten all bolts and screws securely, but do not overtighten.

Image: The fully assembled bunk bed, showcasing its structure and features.
5. Operacioni
Përdorimi i shtratit me rrota
The trundle bed is designed to slide smoothly from underneath the lower bunk. To use, gently pull the trundle frame outwards until it is fully extended. To store, push the trundle back underneath the lower bunk until it is completely hidden.
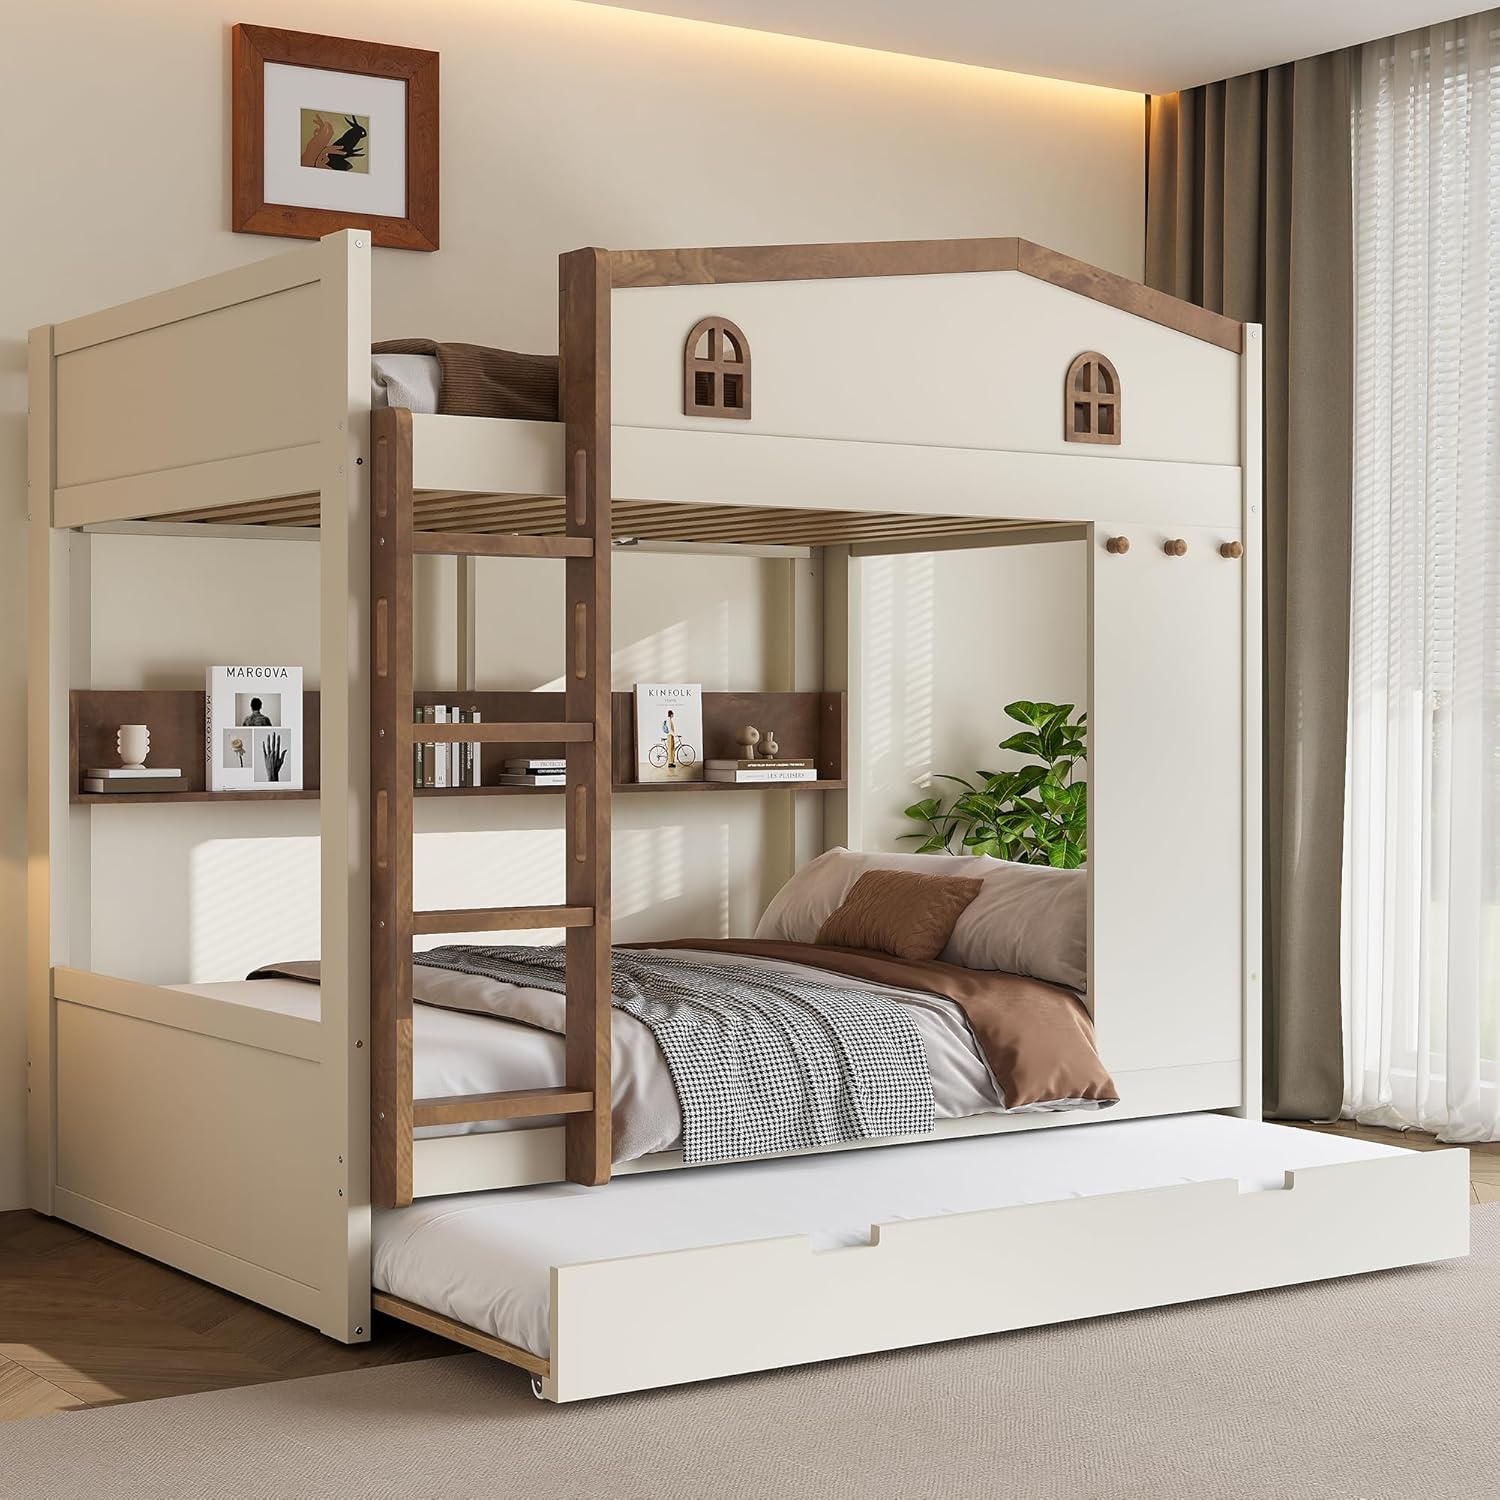
Image: The bunk bed with the trundle extended, ready for use.
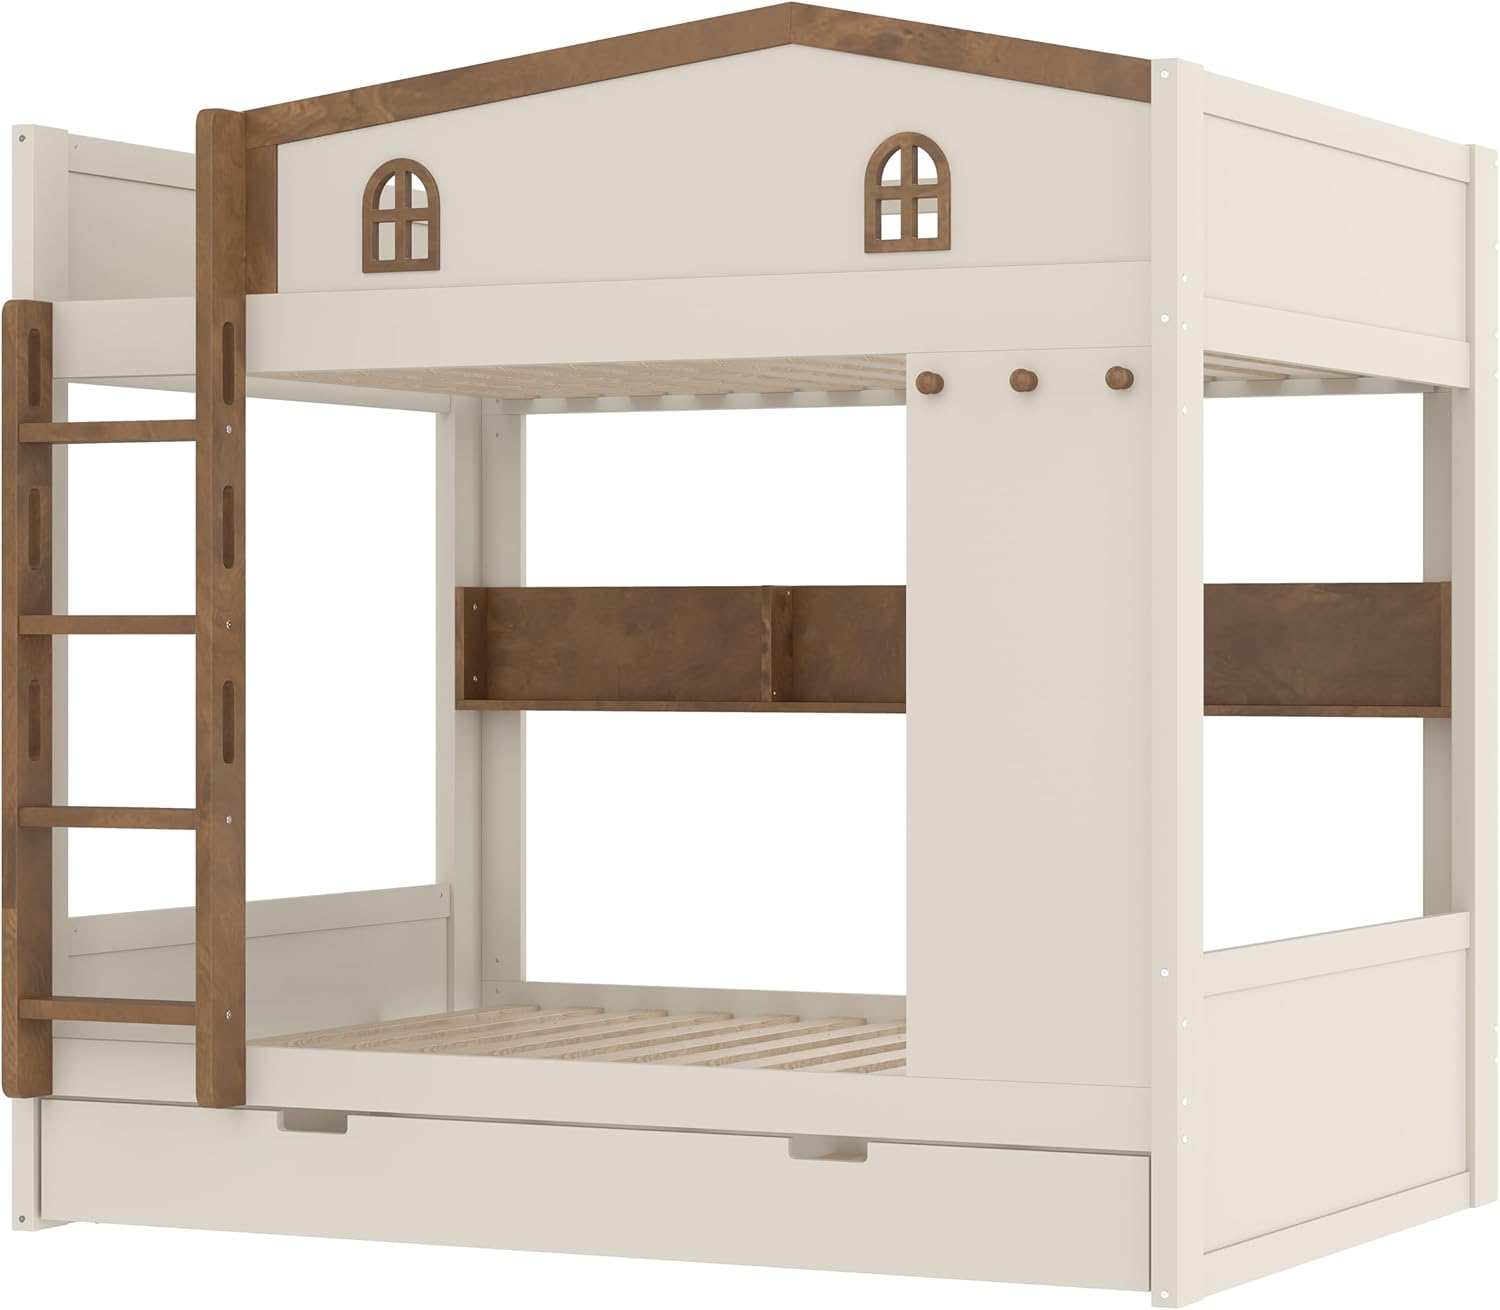
Image: The bunk bed with the trundle stored, demonstrating its space-saving design.
Using Storage Shelves and Hooks
The integrated shelves provide convenient storage for books, small electronics, or decorative items. The hooks are suitable for hanging lightweight items such as bags, hats, or robes. Do not overload shelves or hooks beyond their intended capacity.
6. Mirëmbajtja
- Pastrimi: Fshijeni kornizën e krevatit me një leckë të butë, damp cloth. Avoid using harsh chemicals or abrasive cleaners, which can damage the wood finish.
- Kontrolli i harduerit: Periodically (every 3-6 months) check all bolts, screws, and connections to ensure they are tight. Retighten if necessary, but do not overtighten.
- Integriteti strukturor: Inspect the bed frame for any signs of wear, damage, or loose parts. If any damage is found, discontinue use and contact customer support for replacement parts or advice.
- Kujdesi për dyshekët: Follow the care instructions provided with your mattresses. Rotate and flip mattresses regularly to prolong their lifespan.
7. Troubleshooting
| Problem | Shkaku i mundshëm | Zgjidhje |
|---|---|---|
| Shtrati ndihet i lëkundur ose i paqëndrueshëm. | Pajisje të lirshme. | Kontrolloni dhe shtrëngoni të gjitha bulonat dhe vidat. Sigurohuni që të gjitha lidhjet janë të sigurta. |
| Zhurma kërcitjeje. | Lidhje të lirshme ose fërkime midis pjesëve prej druri. | Shtrëngoni të gjitha pjesët e aksesorëve. Aplikoni një sasi të vogël dylli parafine ose sprej silikoni në pikat e kontaktit midis pjesëve të drurit nëse kërcitja vazhdon. |
| Shtrati me rrota nuk rrëshqet pa probleme. | Obstruction under the bed or dirty wheels. | Clear any objects from under the lower bunk. Clean the trundle wheels and their tracks. Check for damaged wheels. |
| Pjesë që mungojnë ose janë të dëmtuara. | Gabim paketimi ose dëmtim gjatë transportit. | Do not proceed with assembly. Contact Polibi customer support immediately for replacement parts. |
8. Specifikimet
- Marka: polibi
- Modeli: Full Over Full w/trundle
- Dimensionet e produktit (J x P x H): 77.5" x 56.8" x 66.5"
- Materiali: Dru i përpunuar, Dru pishe
- Ngjyra: Beige & Natural
- Karakteristikë e veçantë: Trundle, Storage Shelves & Hooks
- Asambleja e nevojshme: po
- Pesha e artikullit: Përafërsisht 230.16 paund
- Recommended Mattress Thickness (Upper Bunk): Deri në 6 inç
9. Garancia dhe Mbështetja
For specific warranty information regarding your Polibi Wood Full Over Full Bunk Bed, please refer to the documentation included with your purchase or contact the retailer/manufacturer directly. Warranty terms typically cover manufacturing defects for a specified period from the date of purchase.
If you require assistance with assembly, missing parts, or have any questions about your product, please contact Polibi customer support. Contact details can usually be found on the packaging, the retailer's website, or the Polibi brand store on Amazon.
Polibi Brand Store: Visit the Polibi Store on Amazon


